Contact Form Submission With Hugo, hCaptcha, Cloudflare Workers, and Zulip
Published on:
Getting Started
This setup will cover how to handle contact form submissions by sending them to a Zulip server. We’ll use a Cloudflare Worker to handle the API requests and hCaptcha to help prevent abuse.
What you’ll need to get started:
- a Hugo site or any other front-end to build your contact form
- an hCaptcha token (https://dashboard.hcaptcha.com/signup)
- a Cloudflare account (will work with a free/basic account)
- a Zulip server
At any point if you need additional information, the following sites are good resources:
- Hugo Documentation
- hCaptcha Dev Documentation
- Zulip API Documentation
- Cloudflare Worker Documentation
Hugo Setup
In this example we’ll be using Hugo to design the contact page, you can adapt this to work with any other front-end or your plain ole’ HTML page.
To get started we’ll add two parameters to our Hugo config, the development key for local testing provided by hCaptcha and our actual site key for production use. Replace hCaptchaSiteKey with the actual public key provided when creating your keypair in hCaptcha.
[params]
    hCaptchaDevKey = '10000000-ffff-ffff-ffff-000000000001'
    hCaptchaSiteKey = '10000000-ffff-ffff-ffff-000000000002'
Contact Page
Our first step will be creating a markdown file with frontmatter to contain the meta data and some variables to help build our contact page. Our markdown file exists at /content/pages/contact-us.md
---
title: "Contact Us"
date: 2022-08-31

layout: contact-us

internalScripts:
    - js/contact-form.js

externalScripts:
    - https://js.hcaptcha.com/1/api.js?recaptchacompat=off

# additional frontmatter settings, e.g opengraph, social media meta data.
---
The three important settings here are the ‘layout’, ‘internalScripts’, and ‘externalScripts’. We’ll be using a custom layout page defined by ‘layout: contact-us’ to handle the form’s HTML. We will also be loading two Javascript files, one internally that handles our form logic and API submission to our Cloudflare Worker, and an external script that loads hCaptcha’s JS API.
Next we’re going to create the ‘contact us’ page layout with a simple form that leverages HTML5’s built-in form validation.
In Hugo, this layout will exist at ‘/layout/pages/contact-us.html’
{{ define "main" }}
{{- $hCaptchaKey := cond (.Site.IsServer) .Site.Params.hCaptchaDevKey .Site.Params.hCaptchaSiteKey -}}
<article>
    <h1>Contact Us</h1>
    <p>Welcome to our contact page!</p>
    <form id="contact-form" autocomplete="off">
        <input id="contact-name" type="text" name="name" placeholder="Name (required)" required maxlength="100">
        <input id="contact-email" type="email" name="email" placeholder="Email (required)" required maxlength="100">
        <textarea id="contact-textarea" name="message" rows="10" placeholder="Message" required maxlength="5000"></textarea>
        <div id="contact-captcha" class="h-captcha" data-sitekey="{{ $hCaptchaKey }}"></div>
        <input id="contact-submit" type="submit" value="Submit Inquiry">
    </form>
    <div id="contact-status"></div>
</article>
{{ end }}
You’ll notice we’re using some Hugo syntax here. If we are currently developing locally, we’ll use the test key, and if our Hugo site is being published for production, we’ll use our actual site key from hCaptcha. We defined these parameters at the beginning in our Hugo config.toml
{{- $hCaptchaKey := cond (.Site.IsServer) .Site.Params.hCaptchaDevKey .Site.Params.hCaptchaSiteKey -}}

<div id="contact-captcha" class="h-captcha" data-sitekey="{{ $hCaptchaKey }}"></div>
Handling the Javascript
We’re going to now add the form submission logic.
document.getElementById('contact-submit').addEventListener('click', function (event) {

    const form = document.getElementById('contact-form');
    const status = document.getElementById('contact-status');

    if (form.checkValidity()) {
        event.preventDefault();

        // Check if user has completed hCaptcha challenge.
        if (hcaptcha.getResponse().length === 0) {
            // draw attention to hcaptcha
            document.getElementById('contact-captcha').focus();
            return;
        }

        // Disable submit button.
        this.disabled = true;

        // Post form data to API endpoint.
        const url = (isDevelopment) ? 'http://localhost:8787/submitContactForm' : 'https://api.session0.dev/submitContactForm';

        fetch(url, {
            method: 'POST',
            headers: {
                "Content-type": "application/x-www-form-urlencoded; charset=UTF-8"
            },
            body: new URLSearchParams(new FormData(form)).toString()
        })
        .then((response) => {
            //const text = response.text()
            if (response.ok) {
                form.style.display = 'none';
                status.innerText = 'Your message has been submitted.';
            } else {
                status.innerText = 'We encountered an error submitting your message. Please try again.';
                this.disabled = false;
            }
        })
        .catch((error) => {
            console.log('Request failed', error);

            // Enable submit button
            this.disabled = false;
        });
    }

});
Finally, we need to load both our contact form javascript and hCaptcha’s JS API library. As we previously defined internalScripts and externalScripts in our contact-us.md frontmatter, our Hugo logic will find the references and add them to our contact page’s head. We will add the following to our head partial located at /layouts/partials/head.html
<head>
    // If we're currently running Hugo locally, add a global variable to signify we are in development mode.
    {{ if .Site.IsServer -}}
        <script type="text/javascript">const isDevelopment = true;</script>
    {{ end -}}

    // Loop through our frontmatter settings and create a script tag for each entry.
    {{ range .Params.internalScripts -}}
        {{ $script := resources.Get . | minify | fingerprint -}}
        <script type="text/javascript" src="{{ $script.RelPermalink }}" defer></script>
    {{ end -}}

    {{ range .Params.externalScripts -}}
        <script type="text/javascript" src="{{ . }}" defer></script>
    {{ end -}}
</head>
Zulip Setup
This is pretty straightforward, we can either create a new stream or use an existing one to store incoming messages. From there, we’ll create a new incoming webhook bot by going to Personal Settings > Bots > Add New Bot.
We’ll need to create a new incoming webhook bot by going to: Personal Settings > Bots > Add New Bot. Add a name for your bot, and e-mail (this doesn’t have to be an active email address, but will be used to address the API endpoint).
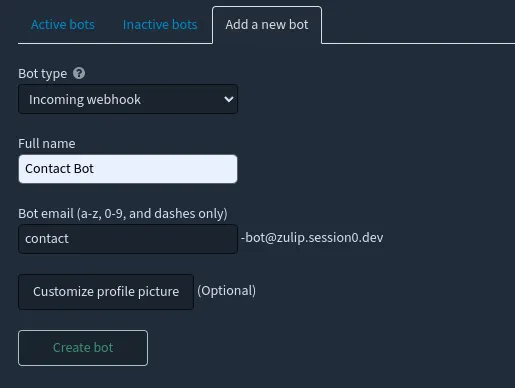
After creation, an API key will be generated. Keep note of this private key and the email address of the bot, we will need this to authenticate incoming messages in the next part.
Cloudflare Worker Setup
To get started, we’ll be using Wrangler v2 (version 2.0.27 at the time of this writing) for local development of our worker. Create your new project and we’ll add the following to our wrangler.toml configuration.
You can adjust the settings to your liking, you can modify which Zulip channel/topic your messages are sent to, also you will need to adjust the CORS header ‘Access-Control-Allow-Origin’ under production to reflect the hostname of your actual website serving your contact page.
# DEVELOPMENT ENVIRONMENT
name = 'api-development'
main = 'src/index.mjs'
compatibility_date = '2022-08-06'
workers_dev = true

[vars]
[vars.CORS_HEADERS]
Access-Control-Allow-Origin = '*'
Access-Control-Allow-Methods = 'GET,POST,OPTIONS'
Access-Control-Max-Age = '86400'

[vars.ZULIP_PARAMS]
type = 'stream'
to = 'your-stream-name-dev'
topic = 'contact-dev'

# PRODUCTION ENVIRONMENT
[env.production]
name = 'api-production'

[env.production.vars]
[env.production.vars.CORS_HEADERS]
Access-Control-Allow-Origin = 'https://session0.dev'
Access-Control-Allow-Methods = 'GET,POST,OPTIONS'
Access-Control-Max-Age = '86400'

[env.production.vars.ZULIP_PARAMS]
type = 'stream'
to = 'your-stream-name'
topic = 'contact'
Secret Keys
We need to add a few secret environment variables to our Cloudflare worker. The hCaptcha private key and the Zulip API endpoint w/ key for both our development and production environments. This will allow us to reference these keys inside our worker without exposing them publicly in our code.
Your Zulip API Token (ZULIP_API_TOKEN) will be a combination of the bot email + API key.
[email protected]:82Ddjwadijd128d12jd2idwdasYour hCaptcha secret key (HCAPTCHA_SECRET_KEY) will be the one provided by hCaptcha when creating a key. For local testing you can use hCaptcha’s development key:
0x0000000000000000000000000000000000000000Using wrangler we can add our secret environment variables by running the following commands.
wrangler secret put HCAPTCHA_SECRET_KEY
wrangler secret put ZULIP_API_TOKEN
wrangler secret put HCAPTCHA_SECRET_KEY --env production
wrangler secret put ZULIP_API_TOKEN --env production
API Design
The worker will be split up into easily digestible pieces. An entry point, POST request handler, contact form logic, and modules for handling both hCaptcha and Zulip API requests.
Our directory structure will look like:
- project
- wrangler.toml
- src
- index.mjs
- contact-form.mjs
- handlers
- post.mjs
- modules
- zulip.mjs
- hcaptcha.mjs
First we’ll create our entry point at src/index.mjs. Here we will route our incoming requests based on the method, first responding to OPTIONS with our CORS headers.
import { handlePostRequest } from "./handlers/post.mjs";

export default {
	async fetch(request, env, context) {
        const corsHeaders = env.CORS_HEADERS;

        // Pre-flight response.
        if (request.method === "OPTIONS") return new Response(null, { headers: { ...corsHeaders } });

        // Route API call.
        switch (request.method) {

            case "GET":
                return new Response("This is a GET request.", { headers: { ...corsHeaders } });

            case "POST":
                return await handlePostRequest(request, env, context);

            default:
                return new Response(null, { status: 405, statusText: 'Method Not Allowed', headers: { ...corsHeaders } });
        }

    }
};
Next we will handle POST requests from ./handlers/post.mjs. This simply checks the incoming URL and routes the request based on the suffixed path. In this case /submitContactForm
import { submitContactForm } from '../contact-form.mjs'

export async function handlePostRequest(request, env) {
    const corsHeaders = env.CORS_HEADERS;
    const url = new URL(request.url);
    const route = url.pathname.slice(1).split('/');

    switch (route[0]) {
        case "submitContactForm":
            return await submitContactForm(request, env);

        default:
            return new Response('We do not understand your POST request.', { status: 400, headers: { ...corsHeaders } });

    }
}
Now we will create two modules, one to handle hCaptcha requests and another to forward our messages to our Zulip server.
First our hCaptcha module. This is a simple example that can be exapnded on with further error handling. We expose a function that takes in a public token, and the secret token which we stored in our worker secret keys. We create this file at src/modules/hcaptcha.mjs
const VERIFY_URL = 'https://hcaptcha.com/siteverify';

export async function submitCaptcha(token, secret) {
    const response = await fetch(VERIFY_URL, {
        method: 'POST',
        headers: { 'Content-Type': 'application/x-www-form-urlencoded' },
        body: new URLSearchParams({ 'secret': secret, 'response': token })
    })
    .then((response) => response.json())
    .then((data) => {
        return data.success;
    })
    .catch((error) => {
        return('Request failed', error);
    });

    return response;
}
And then our Zulip module. Another simple example, this function takes in the contact form message (JSON stringified), our secret API token which was defined in our worker secrets, and finally parameters which were defined in our wrangler.toml. We create this file at src/modules/zulip.mjs
const ZULIP_URL = new Request('https://zulip.session0.dev/api/v1/messages');

export async function submitZulipMessage(message, apiToken, params) {
    const response = await fetch(ZULIP_URL, {
        method: 'POST',
        headers: {
                'Authorization': 'Basic '+btoa(apiToken),
                'Content-Type': 'application/x-www-form-urlencoded'
            },
            body: new URLSearchParams({
                'type': params.type,
                'to': params.to,
                'topic': params.topic,
                'content': message
            })
    })
    .then((response) => {
        return response.ok;
    })
    .catch((error) => {
        return('There was a problem with the fetch operation:', error)
    });

    return response;
}
Finally, we add our contact form logic. Here we are doing some validation checks to help prevent abuse of the API, we’ll check that our content-type is valid and that the request content-length isn’t too large, in this example we’re rejecting any messages over 6kb in size. If these validations are passed, we will forward our hCaptcha response token to hCaptcha and check for a valid response, before finally fowrarding our message to Zulip. We create this file at src/contact-form.mjs
import { submitCaptcha } from './modules/hcaptcha.mjs'
import { submitZulipMessage } from './modules/zulip.mjs'

export async function submitContactForm(request, env) {
    const corsHeaders = env.CORS_HEADERS;

    // Validation check if correct content-type and content-length.
    const { headers } = request;
    const contentLength = headers.get('content-length') || '';
    const contentType = headers.get('content-type') || '';

    if (!contentType.includes('form')) {
        return new Response('Invalid content-type.', { status: 400, headers: { ...corsHeaders } });
    }

    if (!contentLength) {
        return new Response('Content-length is required.', { status: 411, headers: { ...corsHeaders } });
    }

    if (contentLength > 6000) {
        return new Response('Content-length is too large.', { status: 413, headers: { ...corsHeaders } });
    }

    // Grab formData from the request.
    const formData = await request.formData();

    // Check if hCaptcha response is valid.
    const captchaToken = formData.get('h-captcha-response') || '';
    if (!captchaToken) return new Response('No hCaptcha token.', { status: 400, headers: { ...corsHeaders } });

    const captchaResponse = await submitCaptcha(captchaToken, env.HCAPTCHA_SECRET_KEY);
    if (!captchaResponse) return new Response('hCaptcha challenge failed.', { status: 400, headers: { ...corsHeaders } });

    // If we have a valid hCaptcha response, forward formData to our Zulip server.
    formData.delete('h-captcha-response');
    const body = Object.fromEntries(formData);
    const message = JSON.stringify(body, null, 2);
    const zulipResponse = await submitZulipMessage(message, env.ZULIP_API_TOKEN, env.ZULIP_PARAMS);

    if (zulipResponse === true) {
        return new Response('Message submitted.', { status: 200, headers: { ...corsHeaders } });
    } else {
        return new Response('Message could not be submitted.', { status: 400, headers: { ...corsHeaders } });
    }

}
You should now have a functioning API endpoint built on a Cloudflare Worker. You may want to set a custom domain inside Cloudflare, or you can use your *.workers.dev endpoint. Remember to publish your worker using the production environment, as this will use your production environment keys for hCaptcha and Zulip.
wrangler publish --env productionSecurity
Lastly, I want to touch briefly on security. In this setup we have a few layers of defense in the following order:
- Client Side
- HTML5 Form validation
- hCaptcha challenge
- Disabling the submit button to prevent accidental resubmission
- Server Side
- CORS headers to prevent unwanted cross-site requests
- Content-type check to make sure we’re receiving form data
- Content-length check to limit the size of the request
- hCaptcha token validation
- Zulip by default limits API request to 200/min
This works well to prevent general abuse, but could be further expanded on by implementing rate-limiting inside our worker, using something like a Durable Object to log IP addresses and check the number of requests in x number of minutes time window. This would give us flexability to define request limits per endpoint. However, this is outside the scope here.
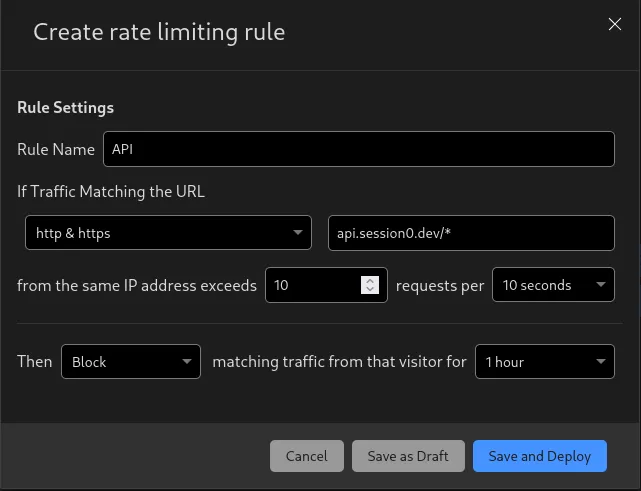
However, we can add a general rate limiting rule from inside Cloudflare using WAF. This does come at a minor cost for heavy API usage, but is simple enough to setup.
Inside our Cloudflare dashbord we can go to Websites > Our Website > Security > WAF (Web Application Firewall) > Rate Limiting Rules. Here you can create a new rate limiting rule to help prevent too many requests to our API endpoint.
If you have any questions or need help with development, feel free to contact us here. We are always looking for new and interesting projects.